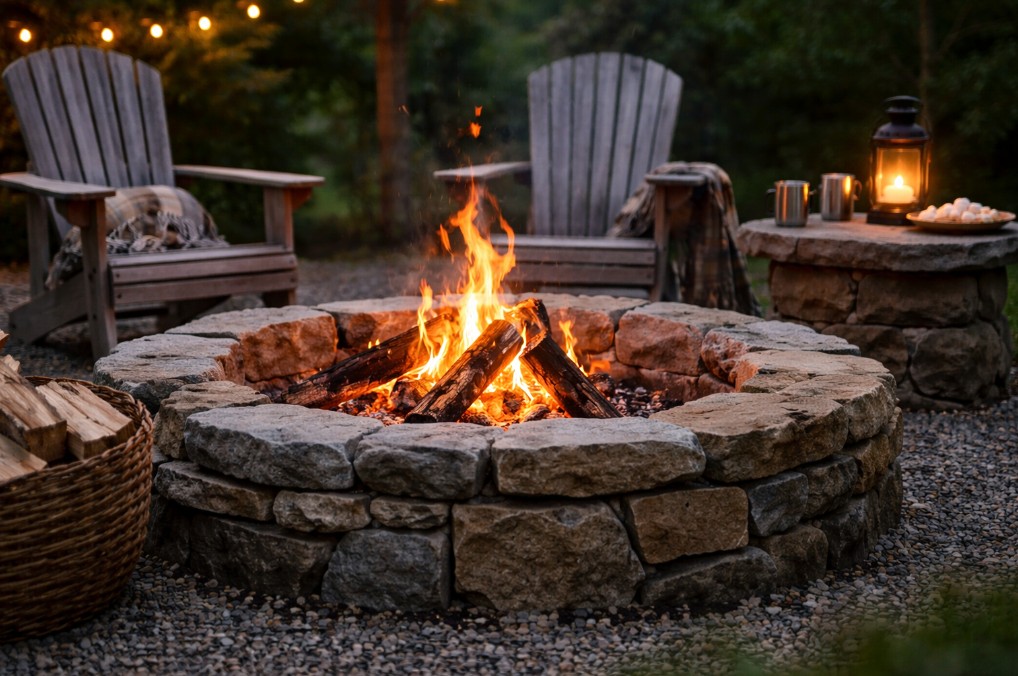
Nothing changes a backyard faster than a stone fire pit. One minute it’s just a patio, the next it’s the place everyone drifts toward when the air turns cool. The best part is you don’t need fancy materials to get that warm, campfire feel, you just need a smart plan, heat-safe stone, and a solid base.
This guide walks you through a simple, beginner-friendly build using local stone, with clear measurements, safety rules, and an option for a temporary, no-dig setup.
Start with safety: location, clearances, and local rules
Before you move a single stone, make sure a fire pit is allowed where you live. Many towns have rules on open burning, setbacks, and burn times. If you’re in a neighborhood with an HOA, check those rules too.
Pick a spot that’s flat, drains well, and won’t send smoke into open windows. Keep these minimum clearances as a baseline (then follow stricter local rules if they apply):
- 10 to 20 ft (3 to 6 m) from houses, fences, sheds, and deck railings
- 10+ ft (3+ m) from tree branches and shrubs (more if trees hang overhead)
- Well away from propane tanks, dry leaves, and stacked lumber
Also call your local utility locate service before digging (in the US, dialing 811 is common). Hitting a line is not a “learning moment,” it’s a real emergency.
Choose the right local stone (and avoid spalling)
Local stone looks like it belongs because it does. But not every rock is safe around high heat.
Use dense, heat-tough stone when you can:
- Granite
- Basalt
- Quartzite
- Many types of fieldstone (if it’s dense and dry)
Be careful with stone that can crack or pop (spall):
- River rock and any stone taken from water (often holds moisture)
- Soft, layered stone like shale
- Very porous stone (some sandstones)
- Unknown rocks that feel light for their size
Spalling happens when trapped water turns to steam inside the stone. Heat builds fast, pressure rises, and flakes can pop off, sometimes violently. The risk is higher if the stone is wet, has hidden seams, or came from a creek bed.
Two simple ways to reduce risk:
- Let stone dry for days before building, longer if it was damp or stored outside.
- Use a steel fire ring insert to keep direct flame off the stone.
A simple size that works in most yards
A practical, social-size wood-burning pit is:
- Inside diameter: 36 in (91 cm)
- Outside diameter: 48 in (122 cm)
- Wall height: 12 to 16 in (30 to 41 cm)
This size throws good heat without needing a bonfire, and it fits 4 to 6 chairs comfortably.
Tools and materials (quick guide)
Here’s a straightforward shopping list for a 36 in (91 cm) inside diameter pit.
| Item | Typical amount | Notes |
|---|---|---|
| Local stone (wall stone) | 60 to 120 pieces | Depends on size and stone shape |
| Crushed gravel base (3/4 in) | 6 to 8 cu ft (0.17 to 0.23 m³) | For drainage and stability |
| Leveling sand | 2 to 3 cu ft (0.06 to 0.08 m³) | Thin leveling layer |
| Steel fire ring insert | 36 in (91 cm) diameter | Keeps flame off stone |
| Landscape fabric (optional) | 1 piece | Helps separate soil and gravel |
| Capstones (optional) | 8 to 12 pieces | For a finished edge |
Tools: shovel, rake, hand tamper (or plate compactor), 2 to 4 ft level (60 to 120 cm), measuring tape, mallet, gloves, safety glasses.
Step-by-step: build a simple stone fire pit with local stone
1) Mark the circle
Decide your inside diameter first. For 36 in (91 cm) inside:
- Mark a center point.
- Use a string radius of 18 in (46 cm) to mark the inner circle.
- Add your wall thickness (often 6 in, 15 cm) to mark the outer circle at about 24 in (61 cm) radius.
Tip: A clean circle makes stacking stone easier, like building a puzzle with a clear border.
2) Dig the base (not a deep hole)
For a stable, frost-friendly base:
- Remove sod and topsoil inside the outer circle.
- Dig 6 to 8 in (15 to 20 cm) deep.
Keep the bottom as flat as you can. Check with a level in a few directions.
3) Build a compacted gravel pad
- Add 4 to 6 in (10 to 15 cm) of crushed gravel.
- Compact in 2 in (5 cm) lifts if possible (add gravel, tamp, repeat).
- Aim for a firm surface that doesn’t shift under your boots.
Optional: Place landscape fabric under the gravel if your soil is soft or silty.
4) Add a thin leveling layer
Spread 1 in (2.5 cm) of leveling sand on top of the gravel. Rake it smooth, then lightly tamp. This helps your first course sit flat.
5) Set the first course (this is the one that matters)
Place your largest, flattest stones first. Work around the ring and:
- Keep stones tight together.
- Check level often, front-to-back and side-to-side.
- Adjust by tapping down with a mallet or adding a little sand under low spots.
If the first layer is wobbly, everything above it will be too.
6) Install the steel fire ring insert
Drop the ring into the center. You want a small gap between ring and stone, around 1/2 to 1 in (1 to 2.5 cm), so the metal can expand with heat.
7) Stack the next courses with staggered joints
Add 1 to 2 more layers of stone (most simple pits are 2 to 3 courses high).
- Stagger vertical seams like brickwork.
- Avoid placing long seams directly above each other.
- If a stone rocks, swap it out or shim with thin stone chips (not wood).
Dry-stacking is beginner-friendly and handles freeze-thaw well, because water has fewer places to get trapped.
8) Add capstones (optional, but worth it)
Capstones make the edge more comfortable and help “lock” the top.
- Use flatter stones.
- Keep caps slightly overhanging inward, about 1 in (2.5 cm), to reduce ash catching on the rim.
Fire pit safety for cozy nights (and calm mornings)
Keep these habits from day one:
- Keep water nearby (bucket or hose) and have a fire extinguisher close.
- Use dry, seasoned firewood to cut down on sparks and smoke.
- Skip accelerants like gasoline. Use a fire starter or kindling.
- Use a spark screen when conditions are dry or breezy.
- Don’t burn on windy days, and don’t leave a fire unattended.
If your fire pit will sit on a concrete patio, protect it. Heat can stain or damage concrete over time, especially with long burns; which is why it’s a good idea to use a heat shield, paver pad, or fire mat.
Optional: a no-dig, temporary stone fire pit
Need something you can remove later, or you’re not ready to dig? Do an above-ground ring:
- Lay a 3 to 4 in (8 to 10 cm) pad of compacted gravel on top of the ground (remove grass first if you can).
- Set a steel fire ring on the gravel.
- Stack stone 2 courses high around the ring.
- Keep the overall height lower, around 8 to 12 in (20 to 30 cm), for stability.
This version isn’t as permanent, but it’s quick, and it’s easier to re-level if the ground settles.
Eco-conscious sourcing: “local” should also mean legal
Local stone can be a smart choice, but source it the right way:
- Buy from a quarry or landscape supplier when possible.
- If collecting on your own property, avoid areas with heavy roots or erosion.
- Don’t remove stone from parks, preserves, riverbanks, or construction sites without written permission.
- Leave habitat rocks in place (small piles and edges often shelter insects, amphibians, and ground-nesting life).
A good rule: if taking stone would leave a scar, don’t take it.
Printable checklist: simple stone fire pit build
- Confirm local rules and HOA guidelines for wood fires
- Choose a flat site with 10 to 20 ft (3 to 6 m) clearance
- Call utility locate before digging
- Pick dense, dry, heat-safe stone, avoid river rock
- Plan size (common: 36 in (91 cm) inside diameter)
- Excavate 6 to 8 in (15 to 20 cm) and compact gravel base
- Add 1 in (2.5 cm) leveling sand
- Level the first stone course carefully
- Install a steel fire ring insert with expansion gap
- Stagger joints as you stack, add capstones if desired
- Keep water and an extinguisher nearby, use a spark screen
- Burn dry wood only, never use accelerants
A simple fire pit should feel relaxing, not risky. Build it solid, place it smart, and you’ll get years of cozy nights from a ring of local stone and a small, steady fire.